A few days ago I discovered this great blog called Kirsten Learns. It's all about this girl named Kirsten and how she's learning to do things. One of the things she's learning to do is edit photos with Photoshop. She wrote a post with some photos she's edited and the tutorials she used to edit them. She wasn't pleased with how the final photo of herself turned out, so since I like editing photos and haven't tried making a Photoshop tutorial yet, I decided to see if I could come up with a good edit of her photo and write a tutorial for how to do it. I asked her for permission to edit her photo and post it and the tutorial on my blog and she said that I definitely could, so here we go.
Here is the original photo.
It's not bad, a bit underexposed, but nothing too hard to fix.
So here's what I did, step by step. (If you would like me to clarify any of the steps let me know in the comments and I'll add a screenshot of that step.)
1. Adjust the exposure. In Adjustments, click Exposure and adjust it so the photo looks like it's the right exposure. (The exposure is the amount that the light lets in when the photo is taken. If it's underexposed, that means there was not enough light let in and the photo will look dark, like this one.) I adjusted the exposure of this photo to +1.7.
2. Add a photo filter. In Adjustments, click Photo Filter. I used Warming Filter (81) at 10% density.
3. Adjust brightness and contrast. In Adjustments, click Brightness/Contrast. I adjusted the brightness to 5 and the contrast to 10.
4. Adjust vibrancy. In Adjustments, click Vibrance. I adjusted it to +10.
5. Copy the background layer.
6. Use the Dodge tool on the eyes to make them more lively. I used the Dodge tool with Range: Midtones and Exposure: 20%. Get the eyes nice and bright, then lower the layer fill (in the Layers panel) until the eyes look natural.
7. Create a new layer. Zoom in on the eyes. You are going to add something called catch lights, which are just the reflection by a light source in a person's eye. Adding them helps to make the eyes more lively. Choose a brush with 50% hardness and make it the size that the catch lights would be. (On this photo there were already very light catch lights, so I just used them to determine the brush size and then made them a bit more intense.) I used a 56 pixel brush size. Click the brush once on each catch light (if you're using a photo that already has them) or click once on each eye in roughly the same position (if you're using a photo that doesn't already have catch lights).
8. Set the blend mode of the layer to Overlay. Turn the layer opacity down until it looks natural. (I used 25%)
9. Create a new layer filled with 50% gray. (Do this by clicking Create a new layer in the Layers panel, then clicking Edit, then Fill. Set it to Use: 50% Gray, Blending Mode: Normal, Opacity 100%.)
10. Set the blend mode of the 50% gray layer to Overlay.
11. While on the 50% gray layer use the Dodge tool on the parts you want to brighten (such as the shine on the hair and the lips) and the Burn tool on the parts you want to darken. (There might not be any but if parts of the face are looking flat and not 3D like they would be in real life, you can darken the edges to make it look more 3D. For example, on this photo I used the burn tool just a little bit where the shadows around the nose were.) This is the Photoshop equivalent of using highlighter and bronzer with makeup to contour your face. Doing it on a 50% gray layer set to Overlay lets you add depth to the photo with a lot of control.
And that's it. With this photo you really only need to adjust the exposure, if you're a Photoshop beginner, to make it look way better. The other steps are all optional and more advanced. I hope something from this tutorial is helpful for you. And definitely let me know if there are any parts of this tutorial that you would like me to explain further or expand upon. Like I said, this is my first Photoshop tutorial, so it's not perfect and I would love to improve it for you in any way possible.
Without further ado, here is the finished product.
Showing posts with label Photoshop. Show all posts
Showing posts with label Photoshop. Show all posts
Tuesday, April 1, 2014
Tuesday Tutorial: Retouching Photos of People in Photoshop
From the brain of
Jessica
when the clock struck
10:58 PM
4
of you tumbled down the rabbit hole

 categorized as:
photo retouching,
Photoshop,
tutorial
Thursday, May 9, 2013
A Simple Flower Photomanipulation
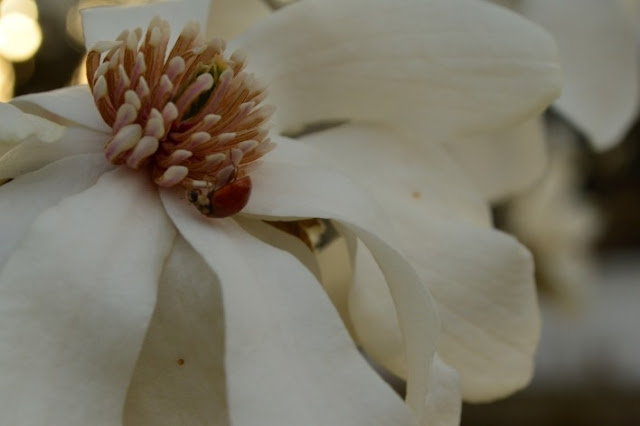
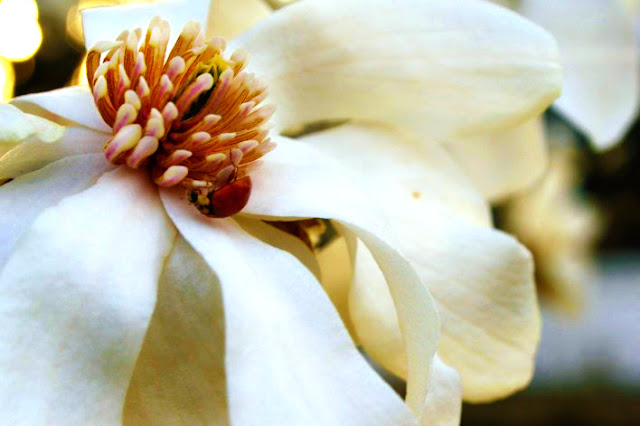
I saw this photo of a magnolia blossom on Witty Title Here and couldn't resist playing with it.
First I adjusted the Exposure. Then I added a new layer, filled it with 50% gray, set the Blend mode to Overlay, then used the Dodge and Burn tools on it to bring out the highlights and shadows. Finaly, I adjusted the Color Balance to give the photo a warmer tone.
 |
| the original photo |
 |
| my edited version |
From the brain of
Jessica
when the clock struck
11:36 AM
2
of you tumbled down the rabbit hole

 categorized as:
flowers,
ladybug,
photo retouching,
Photoshop
Sunday, November 4, 2012
I Made These Patterns for You
I just learned how to make tileable patterns in Photoshop from Pugly Pixel. If you aren't familiar with Pugly Pixel and you are at all interested in design, you should definitely check them out. The website has lots of helpful tutorials as well as tons of freebies. I made a whole bunch of patterns yesterday, so I thought that I would share them with everyone. The fleur de lis and leaf are custom shapes in Photoshop. The envelope and washi tape are from Pugly Pixel. To download all six patterns for free, go here. If you don't want to download all of them, click here. Click on whichever pattern you want to download and then you can download it. You don't need to credit me for anything you use these patterns for. If you would like to donate money to me for the patterns, you can, but please don't unless you really want to.
 |
| Here are little strips of each pattern. They're super cute and I want you to enjoy them. |
Subscribe to:
Posts (Atom)


