Tuesday, April 29, 2014

Movie Review: Odd Thomas

via

Odd Thomas by Dean Koontz is one of my favorite books and I have reread it many times.  For those of you who don't know, Odd Thomas is a series of books by my favorite author, Dean Koontz.  It is about a small town fry cook who just happens to be able to see dead people, and among other things he helps the police catch their killers before they can strike again.  When I heard years ago that it was going to be made into a movie I was excited but not too excited, because books tend to be better than their movies.  I noticed that this movie was finally on Netflix yesterday. (and Netflix didn't even recommend it to me!)  I was busy yesterday so I watched it today, with low expectations, and was not disappointed.  This movie is an incredible adaptation of the book.  I would even say that it was very nearly as good as the book, if not as good.  The cast was wonderful, despite the fact that some people didn't like Stormy but she was very true to the Stormy in the book.  I don't think they could have cast it any better.  The special effects were fantastic and super creepy, especially the bodachs (which look way different and better than they do on the movie poster).  I really loved this entire movie and at the end I cried my eyes out, which never happens to me when I watch movies, even though I was pretty sure I knew how this one would end.  I give this movie 4 stars out of 5, and I highly recommend it to people who like supernatural movies involving serial killers.

One reason this movie made me cry is the beautiful relationship that Stormy and Odd have, which is all I can say about the movie without spoilers.  One of my high school friends committed suicide a few days ago and for some reason it didn't really hit me until after I watched this movie.  It's sad that anyone would ever feel so alone.  So watch this movie and make sure your loved ones know that you love them.  Life is short and precious.

Thursday, April 17, 2014

Modcloth Spring Outfit Contest

FTC Disclosure Statement: This post contains affiliate links and I will be compensated if you make a purchase after clicking on my links.


Share your spring style with ModCloth’s ‘Spring-Time to Shine’ Contest, and you could win a $50 gift certificate! To enter just take a photo of yourself in your freshest spring ensemble and upload it to the Style Gallery. Outfits do not need to feature ModCloth (although it is encouraged!), and users can submit as many entries as their hearts desire. Two winners will be chosen and featured by ModCloth. This contest is open to both domestic and international applications through 1 p.m. PT on 4/28. Please see the ModCloth blog for more details. Good luck!

Tuesday, April 15, 2014

Two for Tuesday: Anna Joyce and Rachel Pfeffer

Two for Tuesday is a post series where I'll be sharing two great Etsy shops and two of my favorite items from each one.  Click the image to go to the product on Etsy.

I picked Anna Joyce this week because the fabric is so bright and colorful and great for spring.  Her shop contains all sorts of lovely sewn goods, including purses, totes, clutches, table linens, and pillows.  I love the bold prints and fun patterns.  These two items are my favorites from her shop.

This hoodie has been a favorite of mine on Etsy for a long time.  It just looks so cozy!

https://www.etsy.com/listing/98285910/hand-printed-cotton-canvas-pillows
I love the design on this pillow.  It also comes in blue, but orange is my favorite color.
I discovered Rachel Pfeffer Designs over a year ago and I love everything that she makes, so it was really hard to choose just two favorites, but I did it, kind of.  I won't say that these two are absolutely my favorites but they are definitely two of my favorites.

https://www.etsy.com/listing/178382493/double-linked-star-necklace
I really love the look of the double chains on each side of this.

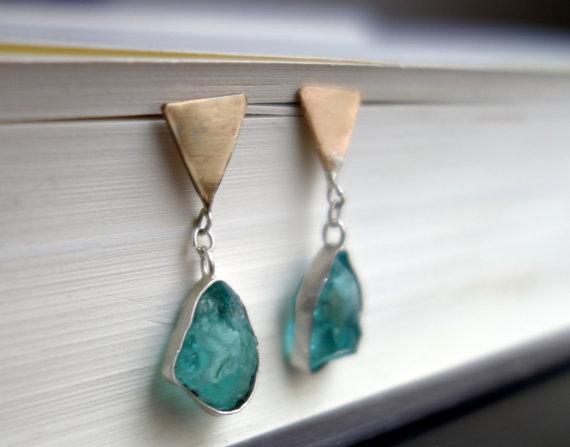
https://www.etsy.com/listing/183058279/apatite-dangles
I love mixed metals, and I adore the stunning blue color of these stones.

Monday, April 14, 2014

Watching, Playing, Reading #6

I'm going to try to do these more often so they aren't so crazy long.

Watching:

Dexter: on Netflix; I tried to watch this show once but I couldn't get into it.  I decided to give it another shot, based on a recommendation from a friend, and I'm so glad I did!  I started two weeks ago and I am already on the eighth, and final, season.  It's about a blood spatter analyst who leads a double life.

I would recommend it to people who like psychological thrillers, serial killer stuff, and who have strong stomachs.

Buffy the Vampire Slayer: on Netflix; I have seen all of this show but one of my friends had not seen any of it, so I had to help right this injustice.  We have been having at least a weekly Buffy night with lots of junk food.

I would recommend it to everyone who likes witty shows, shows with strong female characters, and supernatural shows.

The Boondock Saints: on Netflix; I watched this with N because he said it was his favorite movie in high school and he hasn't seen it in awhile.  I really liked it.  It's kind of similar to Dexter, as far as the vigilante justice stuff goes, and was pretty funny at times, which I appreciate with my action movies.  This movie is about two Irish brothers who decide to kill bad guys together.

I would recommend it to people who like some humor with their action movies, people who like vigilante justice themes, and people who like Irish accents ;)

Deadbeat: on Hulu; I watched the whole season of this in a single day.  It was really funny and I literally laughed out loud the whole time.  It's about a guy who can see and talk to dead people.  He helps them move on to the afterlife.

I would recommend this to people who like shows like Family Guy and The Simpsons.

Playing:

Flash games!  I used to be pretty addicted to these, so I cut myself off for a long time until I could play in moderation.

Edgar's Dream: This is an interactive art game with elements of Edgar Allen Poe.  It is cool, fairly easy and quick to play, and suitably creepy (especially with the sound on).  (I didn't want to go into that tiny hidden door because I expected to find pretty much what I found in there.)  To make it creepier play it late at night with the lights off like I did.

screenshot from the game; this part is reminiscent of Alice in Wonderland


White Door Room Escape:  Escape games and point-and-click games are my favorite kinds of Flash games.  This one was okay but I didn't love it.  It is written in Japanese but that doesn't affect the gameplay.  It was pretty easy and I completed it in under five minutes.  I prefer my escape games with more "logical" escape puzzles, such as having to put together electronics and find tools to aid in your escape.  This one was just finding various codes and then being able to escape after finding them all.

Reading:

Hyperbole and a Half by Allie Brosh: I have wanted to read this book ever since Allie announced that it would be a thing that would exist.  I waited and bought a used copy on Amazon because I am poor thrifty, and I read it in a single day.  This used to be a standard occurrence for me with books but I haven't finished a book in one day since I graduated high school.  Sure it helps that a lot of this book is pictures, but still. 

I would highly recommend this book to everyone who has a sense of humor and likes to laugh out loud when reading books.

Friday, April 11, 2014

Friday Fashion: Red and Black

This outfit is completely thrifted and gifted.


Top: Goodwill, jeans and flats: Crossroads Trading Co., tanktop: gift from my grandma

These jeans are super comfortable.  It feels like wearing pajamas and I love it!  And these flats are slowly falling apart but they've already lasted me over two years and that's pretty good considering the fact that they cost me $15.

Wednesday, April 2, 2014

Where to Eat in Seattle: Seattle Espresso

Since being diagnosed with celiac disease I have kept my eyes out for any restaurant with a sign that has the words "gluten free" on it.  I noticed this one quite awhile ago, and it's my go-to place for chai tea lattes and sweet treats.  It's called Seattle Espresso and it's located conveniently close to Wish, so you can stop in for a snack after shopping for cute clothing and accessories.  Their address is 4405 Wallingford Ave. N, Seattle, WA 98103.  When I went in today I saw that they have new gluten-free shortbread and I knew that I had to try it.  Everyone loves their shortbread but I had never been able to eat it before because it wasn't gluten-free.  In the past I have had their gluten-free cookies (biscotti, monster cookie and lemon oatmeal cookie) and gluten-free blueberry pound cake.  Everything I've tried has been delicious and I would get any of it again in a heartbeat.  Sometimes I just can't choose and I get more than one thing.  I have never experienced any glutening symptoms from my celiac disease after going to Seattle Espresso.  They always do a fantastic job of avoiding cross-contamination between the gluten-free food and gluten-containing ones.  Today I got the gluten-free mint chocolate chip shortbread and a chai tea latte.  It was so good that I ate it really slowly to savor every single bite.  I am definitely going to have to try the other gluten-free shortbread flavors in the future.  Here are some photos for you to drool over.


Seattle Espresso makes really tasty food and drinks that are also really pretty.  It's a really great place to sit and relax and read a book (which is what I usually do there).  Everyone who works there is really nice and friendly, especially Patty.  She always remembers my name and we have a pleasant chat.  She goes above and beyond to make sure everyone has a great experience.  One time she even stayed open late for me and another girl.

Besides delicious gluten-free baked goods, Seattle Espresso also offers handmade Brazilian empanadas and a variety of shortbread cookies and pastries.  I can't comment on the flavor of them because they contain gluten so I have never tasted them, but I have only ever heard the customers say good things about them.  And they certainly look delicious.  Seattle Espresso also makes different coffee drinks and other hot drinks, including apple cider.  They also have amazing catering services.

So whether you eat gluten-free, ove good food, want a sweet treat, enjoy a hot beverage, are hosting an event, or just want to relax in a friendly environment, I highly recommend Seattle Espresso.

Tuesday, April 1, 2014

Tuesday Tutorial: Retouching Photos of People in Photoshop

A few days ago I discovered this great blog called Kirsten Learns.  It's all about this girl named Kirsten and how she's learning to do things.  One of the things she's learning to do is edit photos with Photoshop.  She wrote a post with some photos she's edited and the tutorials she used to edit them.  She wasn't pleased with how the final photo of herself turned out, so since I like editing photos and haven't tried making a Photoshop tutorial yet, I decided to see if I could come up with a good edit of her photo and write a tutorial for how to do it.  I asked her for permission to edit her photo and post it and the tutorial on my blog and she said that I  definitely could, so here we go.

Here is the original photo.


It's not bad, a bit underexposed, but nothing too hard to fix.

So here's what I did, step by step.  (If you would like me to clarify any of the steps let me know in the comments and I'll add a screenshot of that step.)

1.  Adjust the exposure.  In Adjustments, click Exposure and adjust it so the photo looks like it's the right exposure.  (The exposure is the amount that the light lets in when the photo is taken.  If it's underexposed, that means there was not enough light let in and the photo will look dark, like this one.)  I adjusted the exposure of this photo to +1.7.

2. Add a photo filter.  In Adjustments, click Photo Filter.  I used Warming Filter (81) at 10% density.

3. Adjust brightness and contrast.  In Adjustments, click Brightness/Contrast.  I adjusted the brightness to 5 and the contrast to 10.

4.  Adjust vibrancy.  In Adjustments, click Vibrance.  I adjusted it to +10.

5.  Copy the background layer.

6.  Use the Dodge tool on the eyes to make them more lively.  I used the Dodge tool with Range: Midtones and Exposure: 20%.  Get the eyes nice and bright, then lower the layer fill (in the Layers panel) until the eyes look natural.

7.  Create a new layer.  Zoom in on the eyes.  You are going to add something called catch lights, which are just the reflection by a light source in a person's eye.  Adding them helps to make the eyes more lively.  Choose a brush with 50% hardness and make it the size that the catch lights would be.  (On this photo there were already very light catch lights, so I just used them to determine the brush size and then made them a bit more intense.)  I used a 56 pixel brush size.  Click the brush once on each catch light (if you're using a photo that already has them) or click once on each eye in roughly the same position (if you're using a photo that doesn't already have catch lights).

8.  Set the blend mode of the layer to Overlay.  Turn the layer opacity down until it looks natural.  (I used 25%)

9.  Create a new layer filled with 50% gray.  (Do this by clicking Create a new layer in the Layers panel, then clicking Edit, then Fill.  Set it to Use: 50% Gray, Blending Mode: Normal, Opacity 100%.)

10.  Set the blend mode of the 50% gray layer to Overlay.

11.  While on the 50% gray layer use the Dodge tool on the parts you want to brighten (such as the shine on the hair and the lips) and the Burn tool on the parts you want to darken.  (There might not be any but if parts of the face are looking flat and not 3D like they would be in real life, you can darken the edges to make it look more 3D.  For example, on this photo I used the burn tool just a little bit where the shadows around the nose were.)  This is the Photoshop equivalent of using highlighter and bronzer with makeup to contour your face.  Doing it on a 50% gray layer set to Overlay lets you add depth to the photo with a lot of control.

And that's it.  With this photo you really only need to adjust the exposure, if you're a Photoshop beginner, to make it look way better.  The other steps are all optional and more advanced.  I hope something from this tutorial is helpful for you.  And definitely let me know if there are any parts of this tutorial that you would like me to explain further or expand upon.  Like I said, this is my first Photoshop tutorial, so it's not perfect and I would love to improve it for you in any way possible.

Without further ado, here is the finished product.